Unitrends FLR (File level Recovery) provides an instant virtual copy of a VM backup accessible using CIFS or iSCSI without having to do a restore.
You can start FLR from Satori UI or from Powershell:
PS> Get-UebCatalog -Name SQL01|Get-UebBackup

  id type        start_date             system_name
  -- ----        ----------             -----------
1544 Incremental 01/21/2016 09:27:43 pm
1515 Full        01/20/2016 11:33:59 pm

PS> Start-UebFlr -BackupId 1544

PS> Get-UebFlr

id      instance_name status    share_details
--      ------------- ------    -------------
313.flr SQL01         available \\192.168.11.20\flr313
Once FLR is started you can browse \192.168.11.20\flr313 from any machine and copy any file you need from your backup.
While instantly being able to recover all database files by browsing a file share is cool, the purpose of this blog is to show you how to attach to a database copy and do granular instant recovery of SQL database.
Attaching directly to a database from backup allows you to test your application changes on a copy of the production database or use third-party tools to compare and recover granular data from SQL backups without having to copy the database file to another location or doing a full restore.
To do this you will need to leverage the iSCSI access to be able to attach database from backup in read-write mode.
Using iSCSI FLR to attach SQL Server Database from backup
First thing we need to do is to configure iSCSI initiator in Windows.
- Login into server where SQL server is installed
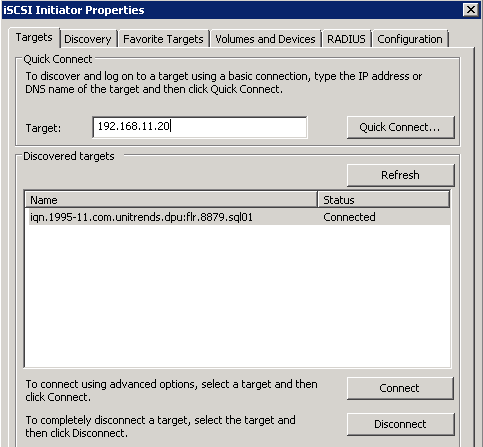
- Start Microsoft iSCSI initiator
- As Target enter the IP of the Unitrends Appliance
- Click Quick Connect

You will see a new discovered target that contains the VM name ( iqn.1995.com.unitrends.dpu:flr.xx.sql01 ) and status should be connected.
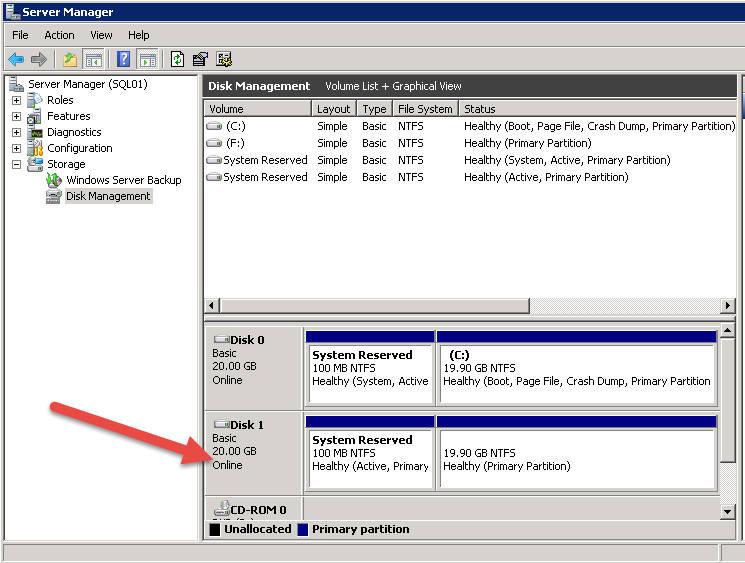
- Open Windows Disk Manager and set the new discovered iscsi disk as online and assign drive letters if necessary ( in this sample F:)

Browse to F: drive and you will see that it contains all data from the point-in-time the backup was created.
Now we can attach the database from the backup:
- Open SQL Management Studio
- Right-click on Databases folder and select Attach
- Click Add and browse to the iSCSI drive (F:)
- Select the database file from the backup (F:\Program Files\Microsoft SQL Server\MSSQL12.SQLEXPRESS\MSSQL\DATA\Northwnd.mdf)
- As you are attaching to the original server you will have to attach with a different name (Northwnd_Copy)
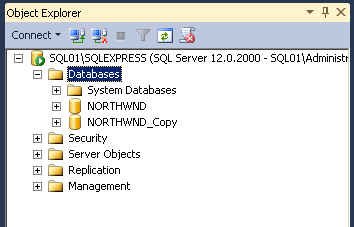
You will see both Databases in SQL Managment Studio: Northwnd and Northwnd_Copy.

You can explore both databases and import/merge data manually using SQL scripts or using SQL Server Import/Export wizard to copy a full table from backup copy to back to production database.
If you dont want to recover a full table and want to know what are the differences between databases you can use third-party tool to compare and merge data.
Using third-party tool to compare Database from backup
There are several tools available and all of them work in the same way. In this blog we are going to use RedGate SQL Data Compare tool.
- Open RedGate SQL Data Compare and select the databases you want to compare (original and the attached from backup)
- Click compare.
The tool will compare schema and data changes between both databases and will report you all the differences and generate SQL script to sync differences.
In this scenario we can see database from backup contains an employee that was deleted from the original database.
You may already have another product to do this and you can use it. If you dont, here is a list of SQL tools you can check to compare Scheme and Data changes in your databases:
- RedGate SQL Data Compare
- ApexSQL
- xSQL Data Compare (Free/Lite version available)
- dbForge
If you have tested any other tool let us know!
Stop FLR session
Once you are done with your SQL recovery you should detach database copy and disconnect iscsi initiator target and stop FLR session using Satori UI or Powershell:
PS> Get-UebFlr

id      instance_name status    share_details
--      ------------- ------    -------------
313.flr SQL01         available \\192.168.11.20\flr313

PS> Stop-UebFlr -FlrId 313.flr